In Part I I machined the receiver. Part II listed all of the parts I used to build the rifle. In this part we'll look at the modifications I made to hopefully improve accuracy and reliability.
 |
| Ruger target bolt assembly |
The bolt usually receives a lot of attention in these guns. As I stated in Part II, I purchased a Ruger target bolt. Besides the polished side, I'm not sure what the difference is between the target and standard bolts. Given the $4 difference in price, I'm guessing not much. The first thing most people recommend is replacing the extractor for more reliable ejection of spent cases from the tighter chambers of aftermarket barrels. I chose the Clark Custom extractor. Installation took just a few minutes.
 |
| Clark extractor |
The next thing usually done to the stock bolt is to reduce the headspace to about 0.043". This makes sure that each round is completely seated in the chamber and the bolt makes full contact with the base of the ammunition; thereby increasing accuracy. I roughly measured my headspace to be about 0.0445". But when I lowered the bolt on a CCI standard velocity round, the round had no room to move at all. I couldn't perceive any excessive headspace. So I'm going to leave it alone for now and see how she shoots. Perhaps the target bolts are hand selected to have tighter headspace than the stock units.
 |
| no extra headspace here |
The last thing I did to the bolt was to round off the back of the bolt. When the bolt retracts, the back of it hits the hammer and cocks it back. The stock bolt hits the hammer at a sharp angle. If you ease the angle of the bolt, then it slides over the hammer rather than slamming into it. This reduces friction, recoil and wear. A few minutes on the belt sander gave it a nice rounded edge. A little polishing with the Dremel made it nice and smooth. I can already feel the improvement; much easier to cock the rifle now.
 |
| stock bolt (Left) and modified bolt (Right) |
 |
| See the stock magazine release? Me neither. |
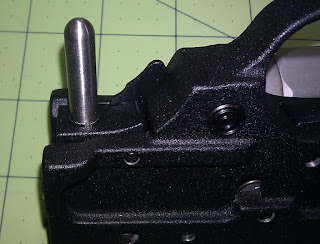
The magazine release button leaves a lot to be desired. I read a forum post where someone said you need a degree in proctology to release the magazine; not far from the truth. After a few decades Ruger finally caught on and new trigger assemblies come with an extended magazine release. My older trigger assembly has the flush mag release. There are dozens of aftermarket extended magazine releases available; everything from little nubs that barely protrude to long arms that wrap around the entire trigger guard. I decided to make my own modeled after the Clarke Custom model.
 |
| Clark mag release |
I drilled and tapped the stock mag release 1/4"-20. Then I grabbed a piece of 1/4" stainless rod and threaded one end to match. Cut it 7/8" long past the threads, rounded the end on my lathe, and polished. Cut the threads to length and secured the pieces together with Loctite. Looks great and works even better.
 |
| ready to assemble |
 |
| extended mag release |
After investing in a target barrel, I want to take good care of it. If you can avoid it, you should never clean from the muzzle of the barrel; you might ruin the crown. The way the Ruger 10/22 is constructed, it is impossible to clean from the breach end unless you use a bore snake or similar. In order to access the breach end, some people drill a hole in the back of the Ruger receiver to pass a cleaning rod through. After I drilled the barrel hole I left the set up as is and used an extra long drill bit to drill the back of the receiver exactly in the center of the bore. Most people just drill a 1/4" hole but I drilled and tapped a 5/16"-18 hole. That way I still have about a 1/4" hole for access but I can close off the hole with a 5/16" grub screw when I am done. Now to clean I remove the action from the stock, remove the trigger group and bolt assembly, and clean the barrel from the back of the receiver. The stainless grub screw I made ensures that dirt and gas don't blow out the back of the receiver right by my face.
 |
| access hole to clean barrel |
 |
| sealed with a grub screw |
Well that's it for the build. The rifle is done! In Part V we'll see if all this work paid off. I'll check accuracy at 50 yards with a variety of ammo. Maybe we'll even take the best ammo out to 100 yards if the conditions are right. Stay tuned!

This comment has been removed by a blog administrator.
ReplyDelete